Surveying large areas present significant challenges in terms of battery life, overlap, covering all areas, drone range, and safety. Most of the difficulties can be dodged by careful and intelligent planning. The amount of time and money invested in mapping is directly proportional to the area to be mapped.
Pre Site Planning
KML Creation: Create a KML of the site you want to map. Make the site’s boundary large enough, so you don’t miss any area you plan to map. With the help of earth browsers such as Google Earth, you can study the area you want to map by inspecting the area. Make sure to confirm that no structures such as chimneys, tall trees, buildings, or any other construction hinders the drone’s path. If any construction or facility that may threaten the drone is inside the boundary of your site, plan in a way that you fly above it.
Splitting the KML: If the area is large enough and has varied landscapes on your site, you need to break the KML. Split the KML according to your requirement and give a unique identification to the KMLs created. While splitting the KML, make sure to have overlapping between adjacent KMLS. Also, you can find a safe and clear elevated area as your home position (Drone Take-Off Position). Make sure the home position is accessible by road and is open and clear. Save the location of the home position while planning.
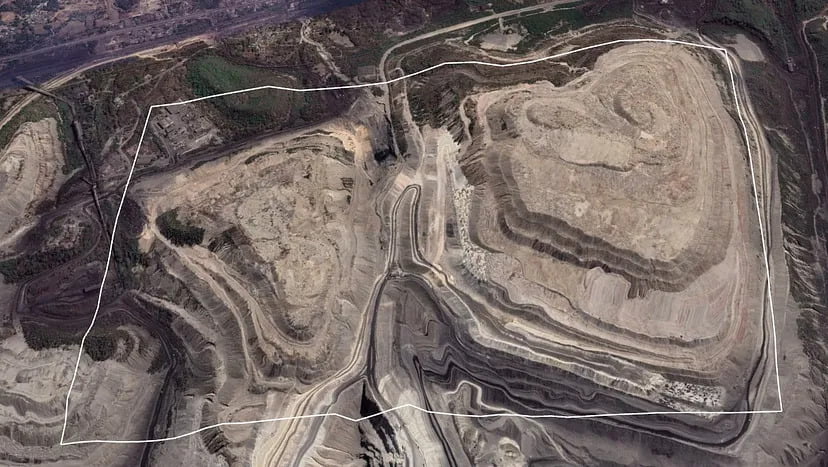
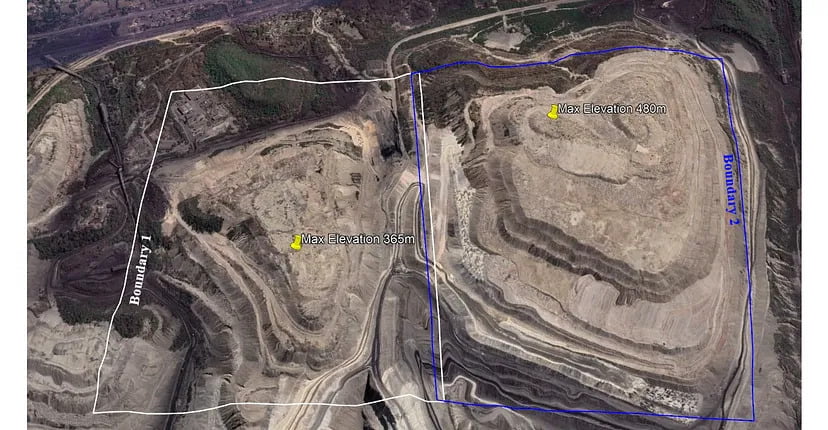
E.g., From Figure above, we can see that this is a mining terrain with a boundary of 310 hectares. The maximum elevation on the left part of the site is 365m, and the maximum elevation on the right part is 480m.
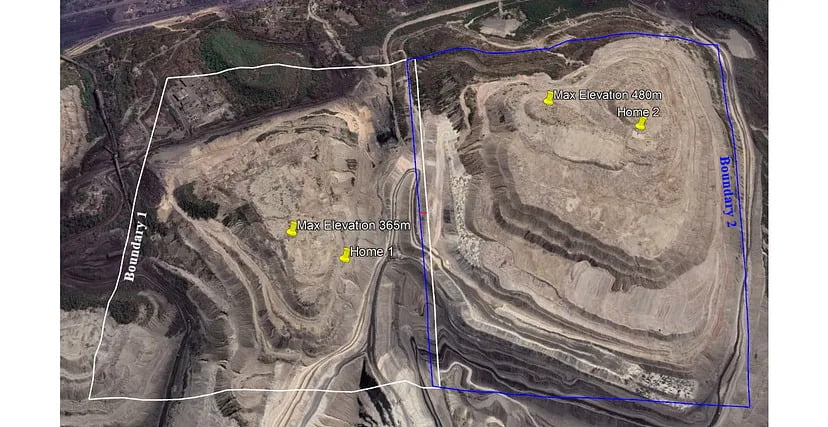
We need to split the KML into two parts since there is an elevation difference of more than 110m. We have saved the KML to Boundary A and Boundary B. Boundary A and B have areas of 144 and 166 hectares, respectively. 30m Overlapping is ensured between the adjacent KMLs denoted by the red line. The home position is represented by the yellow pinpoints and is saved as Home 1 and Home 2, respectively. The home position of Boundary A can be set at any safe and clear point whose elevation is above 345m. The home position for Boundary B can be selected at any safe point whose elevation is above 460m. Here the home positions are set at 354m and 465m, respectively.
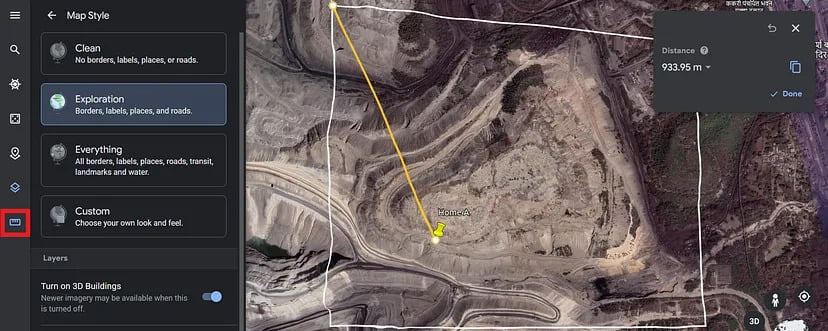
While marking the home position, ensure the boundary is within the drone range. The drone range varies with different drones. We can find the distance from the home position using the Measure Distance and Area option from Google Earth. Measure and check if the boundary exceeds the drone range. Change the home position if the boundary exceeds the drone range.
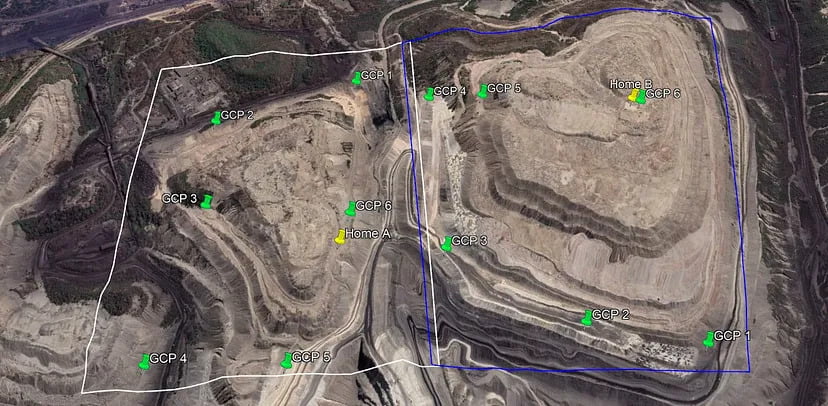
GCPs can also be placed in each KML. Generally, per sq. km or 100 Hectares, 4–5 GCPs are more than sufficient to geo-reference raster data. The thumb rule of placing the GCP is that wherever there’s an abrupt change in the terrain, you can set the GCP, and also, GCPs should be spread out uniformly throughout the landscape. Since the boundary A and B have an area of more than 100 hectares, we can place 6 GCPs per KML.
On Site operations
Planning just the KML is not enough. We must also be aware of other parameters significantly affecting the results while mapping large areas.
Planning just the KML is not enough. We must also be aware of other parameters significantly affecting the results while mapping large areas.
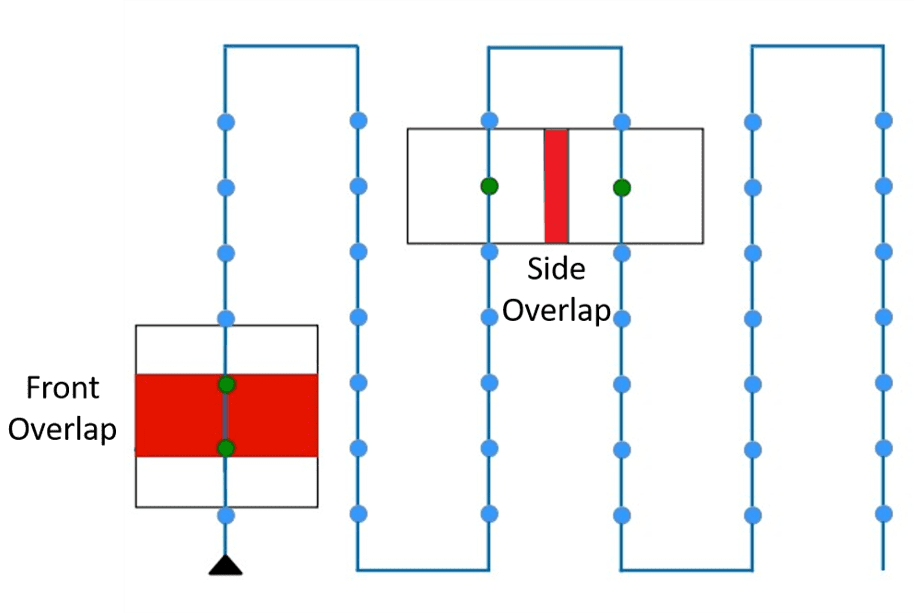
Setting the Overlap: Each drone has a different field of view (F.O.V.) based on the camera. This has consequences for mission planning, particularly for mapping missions that cover large areas. Overlap matches the features between photographs. There are two types of overlap:
Front Overlap: The overlap between successive photographs on a flight path is called front overlap. Increasing the front overlap makes the camera capture more photos quickly. It only affects the number of images.
Side Overlap: The overlap between photographs in adjacent parallel flight paths is called the side overlap. Increasing the side overlap gives more matched features in the imagery but reduces the area your drone can cover in one flight. The flight duration also increases as the number of lines increases.
Increasing the overlap for a flight creates more matched points and greater accuracy. Lower altitude and higher overlapping will increase the number of images and the time required for the flight, but worth it in the long run, as this helps obtain high-resolution images.
Altitude and GSD: It may also come as no shock that flying the drone at a higher altitude helps the camera cover more land area in a single image with fewer batteries and less time overall. This interprets more enormous possibilities for capturing distinctive features in multiple images. But the reciprocation is that the image’s resolution and accuracy will be compromised. Flying at low altitudes captures more details of the area. It also helps match common points while processing, increasing the image resolution and accuracy.
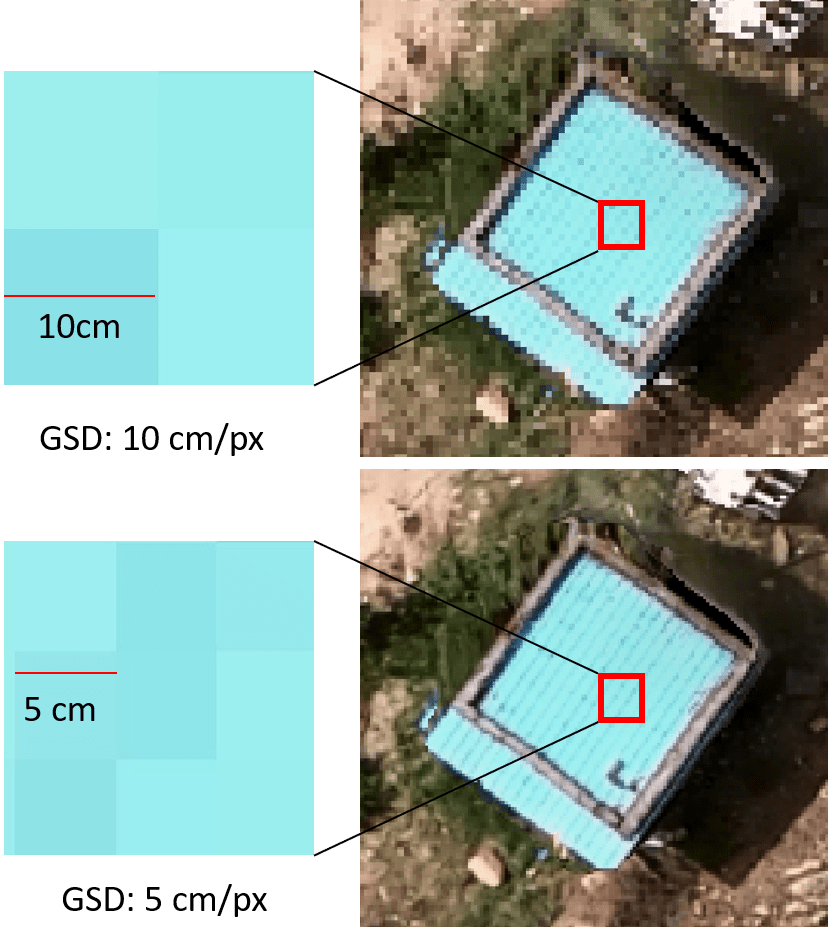
GSD is the distance between the centers of two successive pixels on your map, measured in inches, centimeters, or millimeters. A drone can measure with a GSD of 5 cm/px, meaning that each pixel on your digital map represents 5 centimeters of actual space in the real world.
The formula to calculate GSD is (flight altitude X sensor height) / (focal length X image height and width).
Low altitude and high-resolution sensors will give low GSD. Lower GSD results in higher accuracy.
Battery: The optimization of your battery life will differ depending on the type of drone you use. Mapping large areas require more than one battery to map the whole area. Make sure to carry extra batteries and plan efficiently to save battery life. If the site is large, then you need to make battery swaps. The drone returns home when the battery gets low, and you need to swap the battery and resume the mission. The drone then flies to the position from which it triggers a return home and continues the mission. Store your batteries in a place with stable temperatures.
Environmental factors: Plan and keep an extra day mapping large areas due to environmental factors such as precipitation, wind, etc. It is wise to avoid flying your drone at high wind speeds. You can estimate the wind using wind apps. My personal favorite is windfinder.com. This app has detailed wind forecasts and weather forecasts that let you always find the spot with the best wind weather conditions. Every drone pilot needs to have this app because it will help you plan your flight well.
Check Data in the Field: Technical errors, like camera glitches, overexposed photos, etc., may arise while you are on the field. It is always recommended to review the data you have collected while you are still on-site to make any necessary corrections. The Map Viewer tool from this website solved my problem of checking data in the field. This free tool allows you to upload images, GCP, and KML. The user can then verify that all the images taken are within the KML border by viewing the photos and flight path on a base map.